Overview
OpenCGA implements three different command lines for different purposes, these are opencga.sh, opencga opencga-admin.sh and and opencga-analysis.sh. All All of them follow the same structure, design and share and share many usage features:
- structure: they they are organised in in commands and and subcommands, e.g.:
./opencga.sh <command> <subcommand><subcommand> [options] - authentication: you you need to be authenticated to run the command lines, only only admin user user can run run opencga-admin.sh. Anonymous user user can run run opencga.sh when when using public public studies.
- output: all of them follow the same usage conventions for parameters and output
Architecture
Here you can find a diagram of the three command lines a brief description below:
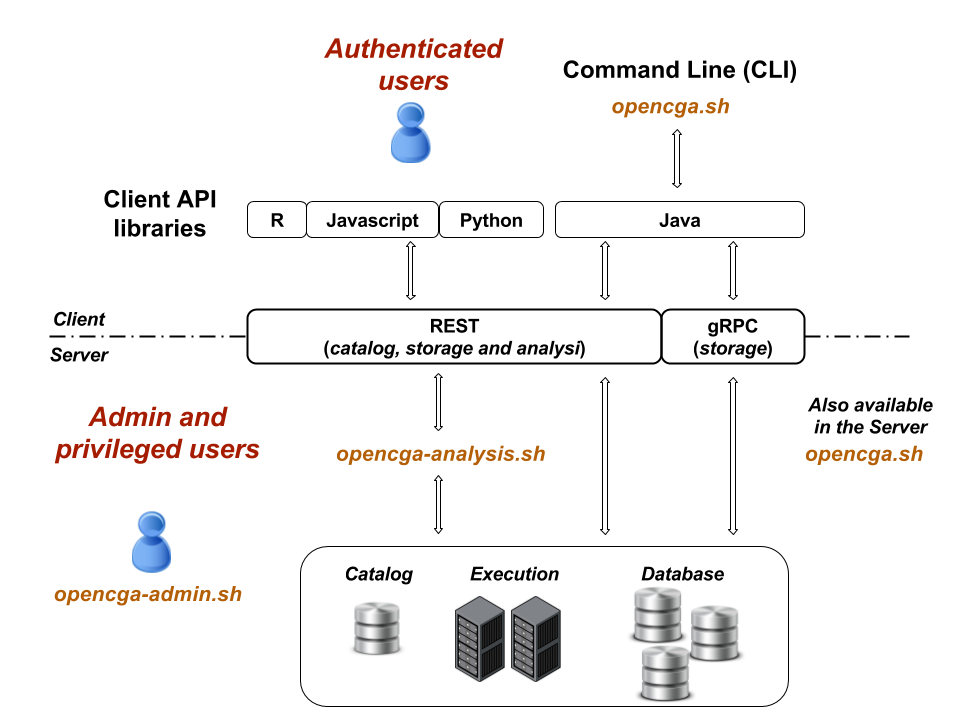
opencga.sh
This is the main command line for normal users, in fact this is the only command line that everybody should use. It implements all the functionality in more than 100 100 command and and subcommands, for example you can login, list files, search samples or query variants. The vast majority of the the subcommands run over run over RESTful web web services so this command line can run run remotely (outside of the cluster) or or locallly (inside the cluster) as long as you have access to the REST server, this command line uses client-configuration.yml file file. You can find more detailed information at Command Lines > opencga.sh
opencga-admin.sh
This command line requires the the admin password password to be executed, it allows to install install catalog database database and indexes, create users, query the audit, ... This does not use RESTful web services and it needs direct access to the server, so it only runs in the OpenCGA cluster and it uses uses configuration.yml. You can find more detailed information at Command Lines > opencga-admin.sh.
opencga-analysis.sh
This command line is used by OpenCGA system itself and nobody is expected to use it unless you are debugging and you really understand how it works. It runs in the cluster and uses uses configuration.yml. No more detailed information is provided at this moment.
General Usage Documentation
In this section you will learn how to use the command lines, some examples are provided using opencga.sh command line.
Basic Command Line Conventions
OpenCGA follows the most standard conventions when implementing command lines, the most relevant ones are:
single-character parameters start with only one hyphen symbol and can be either lower-case or upper-case, e.g. -h to print the help or -S to provide session id; while multi-character parameters start with two hyphens and are always lower-case, e.g.
--help to print the help or --name to provide a name. ./opencga.sh [-h|--help] [--version] <command> [options]Executing a top level command line
You can execute any of the three command lines without any argument to get the usage help (you can also provide -h parameter)
| Code Block | ||||||||||
|---|---|---|---|---|---|---|---|---|---|---|
| ||||||||||
imedina@ivory:~/appl/opencga/build/bin$ ./opencga.sh

Program:     OpenCGA (OpenCB)
Version:     1.0.0-rc3
Git commit:  f42850ff3ff1acb8d0a1bac710c9ec38e084fee5
Description: Big Data platform for processing and analysing NGS data

Usage:       opencga.sh [-h|--help] [--version] <command> [options]

Catalog commands:
         users  User commands
      projects  Project commands
       studies  Study commands
         files  Files commands
          jobs  Jobs commands
   individuals  Individuals commands
       samples  Samples commands
     variables  Variable set commands
       cohorts  Cohorts commands
         tools  Tools commands
        panels  Panels commands

Analysis commands:
    alignments  Implement several tools for the genomic alignment analysis
       variant  Variant commands
|
where:
- Line 1: executing without arguments any of the three command lines (or with -h or --help) print usage information
- Line 3-6: these lines show some metadata about the executable: program name and version, Git commit (in development versions there can be different commits for the same version) and a description.
- Line 8: shows the Usage for this command lines which the same for the three of them, as you can see there are two some optional parameters (in square brackets) help and version; and one mandatory parameter <command> is required. Parameter --help prints this usage and parameter --version prints the version and Git commit.
- Line 10: the different commands for this command line are printed together with a description
Executing a specific command
When one command is executed without any other argument a specific help is shown, this specific help shows the different subcommands available with a brief description, as you can see in the following example
| Code Block | ||||||||
|---|---|---|---|---|---|---|---|---|
| ||||||||
imedina@ivory:~/appl/opencga/build/bin$ ./opencga.sh users

Usage:   opencga.sh users <subcommand> [options]

Subcommands:
        create  Create a new user
          info  Get complete information of the user together with owned and shared projects and studies
        update  Update some user attributes using GET method
change-password  Update some user attributes using GET method
        delete  Delete an user [NO TESTED]
      projects  List all projects and studies belonging to the selected user
         login  Login as a user
        logout  End user session
reset-password  Reset password
|
where:
- Line 3: shows the specific Usage for this command line, as explained above you can see there is a mandatory parameter <subcommand> and then some possible options (in square brackets).
- Line 5: here you can see the specific subcommands for user command, many of the subcommands are specific of each command although others can be quite common.
Executing a specific subcommand
When one subcommand is executed with -h or --help parameter then a specific usage help with all the options is printed for this subcommand, check next example
| language | text |
|---|---|
| theme | RDark |
| linenumbers | true |
| Include Page |
|---|
where:
- Line 3: reminds us the command and subcommand we are executing, the only other parameter is options, which is not mandatory since is between square brackets.
- Line 5: here we can see the different options accepted by this subcommand. The options are formatted in three main columns:
- The first column shows the short and long name of the parameters, both have the same behaviour. Options preceded by an asterisk (*) are the mandatory parameters of this subcommand, an error will be thrown unless those parameters are provided, the rest of the parameters are optional.
- The second column shows the type of input expected for that option. Most of them are STRING although INT is also quite common. When this is empty means that the parameter is a flag and this option is a boolean, meaning that the option will be active if parameter is present.
- The third column shows a brief description of the parameter. In some of them we can find the default value in square brackets.
Common options
Some of these options are available for most of the commands and subcommands, these are:
-C, --conf: If not defined, the command line will assume that the configuration folder can be found in the parent folder where the executable is found (../conf). If that is not the case or if the user wants to use other configuration files available in a different path, the path should be provided.
-h, --help: Shows the help with the list of options. Generally this is not necessary because there is almost always a mandatory parameter to be provided, although it is needed in a few cases if user wants to see the options.
--log-file: By default, all the logs generated by the command lines are printed in the screen. However, the user might want to redirect the logs to another file. For those cases, the user will need to provide the file where the logs will be stored.
-L, --log-level: There are 5 different log levels. EXPLAIN THIS BETTER.
|
Table of Contents:
| Table of Contents | ||
|---|---|---|
|