Overview
OpenCGA implements a Python REST client library called PyOpenCGA to execute any query or operation through the REST web services API. PyOpenCGA provides programmatic access to all the implemented REST web services, providing an easy, lightweight, fast and intuitive solution to access OpenCGA data. The library offers the convenience of an object-oriented scripting language and provides the ability to integrate the obtained results into other Python applications.
Some of the main features include:
- full RESTful web service API implemented, all endpoints are supported including new alignment or clinical functionality.
- data is returned in a new RestResponse object which contains metadata and the results, some handy methods and iterators implemented.
- it uses the OpenCGA client-configuration.yml file.
- several Jupyter Notebooks implemented.
PyOpenCGA has been implemented by Daniel Perez, Pablo Marin and David Gomez and it is based on a previous library called pyCGA implemented by Antonio Rueda and Daniel Perez from Genomics England. The code is open-source and can be found at https://github.com/opencb/opencga/tree/develop/opencga-client/src/main/python/pyOpenCGA. It can be installed using PyPI and . Please, find more details on how to use the python library at Using the Python client.
Installation
Python client requires at least Python 3.x, although most of the code is fully compatible with Python 2.7. You can install PyOpenCGA either from PyPI repository or from source code.
PyPI
PyOpenCGA client is available at PyPI repository at https://pypi.org/project/pyopencga/. Installation is as simple as running the following command line:
| Code Block | ||||
|---|---|---|---|---|
| ||||
## Latest stable version pip install pyopencga |
Source Code
From OpenCGA v2.0.0 the Python client source code can be found at GitHub Release at https://github.com/opencb/opencga/releases. You can easily install pyOpenCGA using the setup.py file.
| Code Block | ||||
|---|---|---|---|---|
| ||||
## Get latest stable version from https://github.com/opencb/opencga/releases. You can use wget from the terminal wget https://github.com/opencb/opencga/releases/download/v2.0.0/opencga-2.0.0.tar.gz ## Decompress tar -zxvf opencga-2.0.0.tar.gz ## Move to the pyOpenCGA client folder cd opencga-2.0.0/clients/python ## Install the library python setup.py install |
Getting started
Client Configuration
Configuration is handled by the ClientConfiguration class. You can create a ClientConfiguration using either the conf/client-configuration.yml file or by passing a dictionary.
| Code Block | ||||
|---|---|---|---|---|
| ||||
## Import ClientConfiguration class
from pyopencga.opencga_config import ClientConfiguration

## You can create a ClientConfiguration by using the path to the client-configuration.yml file (it can also accept a JSON file)
config = ClientConfiguration('opencga-2.0.0/conf/client-configuration.yml')

## Additionally, you can pass a dictionary using the same structure as the client-configuration.yml (the only required parameter is REST host)
config = ClientConfiguration({"rest": {"host": "http://bioinfo.hpc.cam.ac.uk/opencga-demo"}})
|
OpenCGA Client
OpencgaClient is the main class in pyOpenCGA. It manages login/logout authentication, REST clients initialisation and provides a set of other utilities.
To create an OpencgaClient instance, a ClientConfiguration instance must be passed as an argument. You can authenticate in two different ways. First, you can login by providing the user and optionally the password. Second, you can provide a valid token when creating OpencgaClient. Remember that token are only valid for a period of time.
| Code Block | ||||
|---|---|---|---|---|
| ||||
## Import ClientConfiguration and OpencgaClient class
from pyopencga.opencga_config import ClientConfiguration
from pyopencga.opencga_client import OpencgaClient

## Create an instance of OpencgaClient passing the configuration
config = ClientConfiguration('opencga-2.0.0/conf/client-configuration.yml')
oc = OpencgaClient(config)

## Two authentication options:
## Option 1. If the user has a valid token, it can be passed to start doing calls as an authenticated user
oc = OpencgaClient(config, token='TOKEN')

## Option 2. If no token is provided, the user must login with valid credentials. Password is optional (if it is not passed to the login method, it will be prompted to the user)
oc.login(user='USER')	## The password will be asked
# or
oc.login(user='USER', password='PASSWORD')

## You can logout by executing the following command, the token will be deleted.
oc.logout() |
The OpencgaClient class works as a client factory containing all the different clients, one per REST resource, that are necessary to call any REST web service. Below is a list of available clients:
| Code Block | ||||
|---|---|---|---|---|
| ||||
## Create main clients users = oc.users projects = oc.projects studies = oc.studies files = oc.files jobs = oc.jobs families = oc.families individuals = oc.individuals samples = oc.samples cohorts = oc.cohorts panels = oc.panels ## Create analysis clients alignments = oc.alignment variants = oc.variant clinical = oc.clinical ga4gh = oc.ga4gh ## Create administrative clients admin = oc.admin meta = oc.meta variant_operations = oc.variant_operations |
Client API
Clients implements all available REST API endpoints, one method has been implemented for each REST web service. The list of available actions that can be performed with all those clients can be checked in Swagger as explained in RESTful Web Services#Swagger. Each particular client has a method defined for each available web service implemented for the resource. For instance, the whole list of actions available for the Sample resource are shown below.
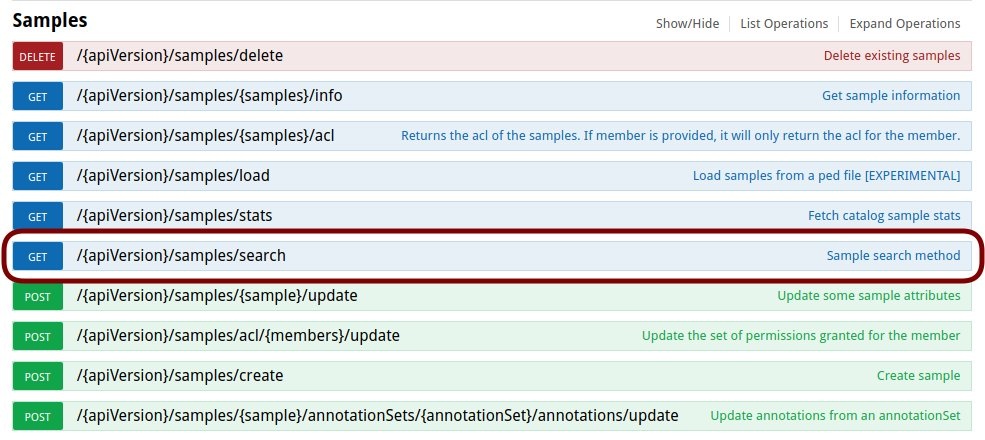
For all those actions, there is a method available in the sample client. For instance, to search for samples using the /search web service, you need to execute:
| Code Block | ||||
|---|---|---|---|---|
| ||||
## Look for the first 5 sample IDs of the study "study" sample_result = oc.samples.search(study='study', limit=5, include='id') |
Working with the RestResponse
As described in RESTful Web Services#RESTResponse, all REST web services return a RestResponse object containing some metadata and a list of OpenCGAResults. Each of these OpenCGAResults contain some other metadata and the actual data results.
To work with these REST responses in an easier way, RestResponse calss has been implemented to wrap the web service RetResponse object and offer some useful methods to process the results. For instance, the sample_result variable from the example above is a RestResponse instance. This object defines several methods to navigate through the data.
The implemented RestResponse methods are:
| Code Block | ||||
|---|---|---|---|---|
| ||||
## Returns the list of results for the response in position "response_pos" (response_pos=0 by default)
sample_response.get_results(response_pos)

## Returns the result in position "result_pos" for the response in position "response_pos" (response_pos=0 by default)
sample_response.get_result(result_pos, response_pos)

## Returns the list of responses
sample_response.get_responses()

## Returns the response in position "response_pos" (response_pos=0 by default)
sample_response.get_response(response_pos)

## Returns all results from the response in position "response_pos" as an iterator (response_pos=None returns all results for all QueryResponses)
sample_response.result_iterator(response_pos)

## Returns all response events by type "event_type" ('INFO', 'WARNING' or 'ERROR') (event_type=None returns all types of event)
sample_response.get_response_events(event_type)

## Returns all response events by type "event_type" ('INFO', 'WARNING or 'ERROR') for the response in position "response_pos" (event_type=None returns all types of event; response_pos=0 by default)
sample_response.get_result_events(event_type, response_pos)

## Return number of matches for the response in position "response_pos" (response_pos=None returns the number for all QueryResponses)
samplsamplesample_responsee_resultresponse.get_num_matches(response_pos)

## Return number of results for the response in position "response_pos" (response_pos=None returns the number for all QueryResponses)
sample_response.get_num_results(response_pos)

## Return number of insertions for the response in position "response_pos" (response_pos=None returns the number for all QueryResponses)
sample_response.get_num_inserted(response_pos)

## Return number of updates for the response in position "response_pos" (response_pos=None returns the number for all QueryResponses)
sample_response.get_num_updated(response_pos)

## Return number of deletions for the response in position "response_pos" (response_pos=None returns the number for all QueryResponses)
sample_resultresponse.get_num_deleted(response_pos) |
To explore the data in an easier way, a method named print_results has also been implemented to show the response in a more human-readable format.
| Code Block | ||||
|---|---|---|---|---|
| ||||
## Print results of the query for the response in position "response_pos" (response_pos=None returns the results for all QueryResponses) sample_resultresponse.print_results(fields='id', response_pos=0, limit=5, separator='\t', metadata=True, outfile='path/to/output.tsv') |
Examples and tutorials
A full first example of how to use and perform some queries can be found below:
| Code Block | ||||||||
|---|---|---|---|---|---|---|---|---|
| ||||||||
# First, we need to import both the ClientConfiguration and the OpencgaClient
from pyopencga.opencga_config import ClientConfiguration
from pyopencga.opencga_client import OpencgaClient

# The main client-configuration.yml file has a "host" section to point to the REST OpenCGA endpoints.
# We need to either pass the path to the configuration file or a dictionary with the format of the file.
config = ClientConfiguration({"rest": {"host": "http://bioinfo.hpc.cam.ac.uk/opencga-demo"}})

# And finally create an instance of the OpencgaClient passing the configuration
oc = OpencgaClient(config)

# Now we need to authenticate.
oc.login(user='demo', password='demo')

# We can check that we've logged in successfully by printing the obtained token
print(oc.token)

# We can get the name of all the available projects
for project in oc.projects.search().get_results():
    print(project['id'])

# We can also get the name of all the available studies
for study in oc.studies.search(project='exomes_grch37').get_results():
    print(study['id'])

# Let's assume our installation already has been populated and we are interested in looking for
# all the families containing a concrete disorder: 'Rod-cone dystrophy'. To fetch this data, we will need to:
family_query_response = oc.families.search(study="study1", limit=10, disorders="Rod-cone dystrophy", include="id,members.id")

# Running oc.families.search(disorders="Rod-cone dystrophy") with only the 'disorders' field would only work
# if only one project and one study has been defined. However, we expect that most of the OpenCGA installations
# will have more than one study, so we need to specify the families of which study we are looking for.

# Additionally, we are passing limit = 10 to limit the number of family results we want to fetch. Because this
# is an example, we are simply limiting the number of results to 10.

# Finally, if we don't specify anything else, all the values from the Family will be fetched. When writing
# scripts, we are normally interested in just a few fields of a whole entry, so adding the include/exclude fields
# will definitely help us getting the results faster as we will avoid sending data we are going to discard through
# the network. In this particular case, we are only interested in getting the Family id and the id of the members
# of the family. To know what fields you can include/exclude, please follow the data models we have defined.

# family_query_response is an instance of the QueryResponse class defined in the Python library. To read the fields,
# we could do the following:
family_query_response.time         # Get the time spent with the REST call
family_query_response.apiVersion   # Get the API version of the REST
family_query_response.queryOptions # Get the QueryOptions of the call (include/exclude, limit, skip, count...)
family_query_response.warning      # Get warning messages
family_query_response.error        # Get error messages
family_query_response.responses    # Get the responses (Array of QueryResults containing the data queried)

# We can iterate over all the results to print all the id's using the 'results()' method such as in the example below:
for family in family_query_response.results():
	print (family['id'])

# We could have this same behaviour if we run the following script, which is why 'results()' is that useful.
for query_result in family_query_response.responses:
	for family in query_result['results']:
		print (family['id'])

# If we want to know exactly the amount of results obtained, we can run:
family_query_response.num_results()

# Or let's say that instead of querying the data, we only wanted to get the number of families in the study with that disorder. In that case, we could:
family_count_response = oc.families.search(study="study1", disorders="Rod-cone dystrophy", count=True)

# And then get the number of matches by calling to the num_matches method:
family_count_response.num_matches()

# Now that we know how to work with the OpenCGA QueryResponse object, we will write a script to fetch all the variants
# falling in the 'BMPR2' gene found in any member of the family. In this case, we will limit the variant query to a maximum
# of 10 results excluding the sample information (sample information can be huge and would make this query much slower).
for family in oc.families.search(study="study1",limit=10,disorders="Rod-cone dystrophy",include="id").results():
    print ("Family: " + family['id'])
    variant_response = oc.variant.query(family=family['id'], gene= 'BMPR2', study='study1', includeSamples=None, limit=10)
    if variant_response.num_total_results() > 0:
        for variant in variant_response.results():
            print (variant['chromosome'] + ":" + str(variant['start']) + "-" + str(variant['end']) + '\t' + variant['type'])
    else:
        print ("No variant results found")
    print()
|
Additionally, there are several notebooks defined in https://github.com/opencb/opencga/tree/develop/opencga-client/src/main/python/pyOpenCGA/notebooks with more real examples.