Prerequisites
A working setup of openCGA is required, please follow the steps on installation guide.
Download Test Data
For this tutorial, download and use ALL.chr22.phase3_shapeit2_mvncall_integrated_v5a.20130502.genotypes.vcf.gz from Genomes ftp.
Initialisation
All of the following steps assume user is under openCGA installation directory (/opt/opencga/).
| Code Block |
|---|
cd /opt/opencga |
The following CLI command will create the database, the collections and all the indexes, it also creates the admin user with the specified password. The MongoDB database host and name are read from the /conf/catalog-configuration.yml file by default.
| Code Block |
|---|
| title | Install Catalog v1.4.x |
|---|
|
./bin/opencga-admin.sh catalog install --secret-key any_string_you_want <<< admin_P@ssword |
| Code Block |
|---|
| title | Install Catalog v1.3.x |
|---|
| collapse | true |
|---|
|
./bin/opencga-admin.sh catalog install --algorithm HS256 --secret-key any_string_you_want -p <<< admin_P@ssword |
Now start the catalog daemon. Run this command in a different tab as it will be logging everything that is happening in real time.
| Code Block |
|---|
| title | Start Catalog Daemon |
|---|
|
./bin/opencga-admin.sh catalog daemon --start -p <<< admin_P@ssword |
This following command will create a user name "John Doe" and ID "test". Note that as by default OpenCGA is configured as private which means that only admin user can create other users. We are using opencga-admin CLI
| Code Block |
|---|
|
./bin/opencga-admin.sh users create -p -u test --email test@gel.ac.uk --name "John Doe" --user-password user_P@ssword <<< admin_P@ssword |
Now we will use this newly created user "test" for further actions, for this first user need to login. The next statement will do that:
| Code Block |
|---|
|
./bin/opencga.sh users login -u test -p <<< user_P@ssword |
This will create a hidden directory in your home called .opencga. This directory will contain a file named ~/.opencga/session.json with the users and the session id, this will be used automatically by opencga.sh, this is valid only for some minutes, by doing this users do not have to write the password too many times. The contents of session.json file will look like :
| Code Block |
|---|
| language | xml |
|---|
| title | session.json |
|---|
|
{
  "host" : "http://localhost:8080/opencga",
  "version" : "v1",
  "user" : "test",
  "token" : "eyJhbGciOiJIUzI1NiJ9.eyJzdWIiOiJ0ZXN0IiwiYXVkIjoiT3BlbkNHQSB1c2VycyIsImlhdCI6MTU1NzkyNjg0MCwiZXhwIjoxNTU3OTMwNDQwfQ.cGoeHoC6z2XoOTBngG6cBLVhXQ3ahVV__dTdp2AXBDI",
  "login" : "20190515142721",
  "expirationTime" : "20190515152720",
  "projectsAndStudies" : { }
} |
Now with new user, we create a project name "Reference studies GRCh37" and alias "reference_grch37" with the following command :
| Code Block |
|---|
|
./opencga.sh projects create --id reference_grch37 -n "Reference studies GRCh37" --organism-scientific-name "Homo sapiens" --organism-assembly "GRCh37" |
Note: organism-scientific-name and organism-assembly should be available in CellBase. User can get this information using the following public WS: http://bioinfo.hpc.cam.ac.uk/cellbase/webservices/rest/v4/meta/species
Next step, create a study named "1000 Genomes Project - Phase 3" inside project "reference_grch37"
| Code Block |
|---|
|
./bin/opencga.sh studies create --id 1kG_phase3 -n "1000 Genomes Project - Phase 3" --project reference_grch37 |
Now lets link/register downloaded file(s)s with newly created study. This process will add a file entry in catalog with some information and stats of file(s)
| Code Block |
|---|
|
./bin/opencga.sh files link -i ALL.chr22.phase3_shapeit2_mvncall_integrated_v5a.20130502.genotypes.vcf.gz -s 1kG_phase3 |
Now as this file is linked into openCGA catalog, user can index variants. Below is the pictorial representation of indexing pipeline:
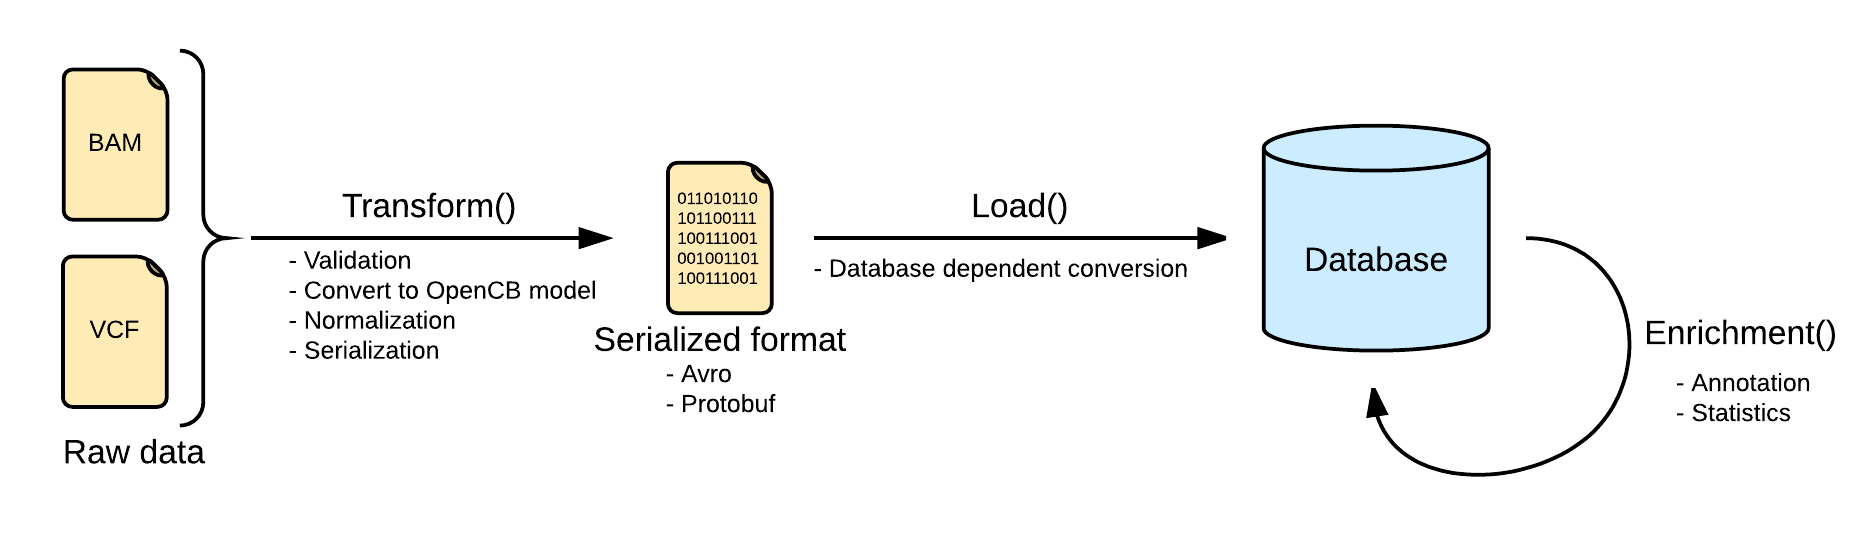
The next step would be to transform this variant file. (This wiki page explains these concepts in detail)
| Code Block |
|---|
|
./bin/opencga.sh variant index --file ALL.chr22.phase3_shapeit2_mvncall_integrated_v5a.20130502.genotypes.vcf.gz --transform -o outDir |
The daemon will start transforming the VCF file (see the completion percentage from the daemon logs). Next, we load transformed data into openCGA storage.
| Code Block |
|---|
|
./bin/opencga.sh variant index --file ALL.chr22.phase3_shapeit2_mvncall_integrated_v5a.20130502.genotypes.vcf.gz --load -o outDir |
After this user can annotate the variants. We will use opencga-analysis.sh script for this purpose
| Code Block |
|---|
|
mkdir -p /tmp/temporal_annotation ### temporary directory
./opencga-analysis.sh variant annotate -s 1kG_phase3 -o /tmp/temporal_annotation |
As last step, use can calculate statistics on this data using the following command
| Code Block |
|---|
|
mkdir -p /tmp/temporal_statistics
./opencga-analysis.sh variant stats -s 1kG_phase3 -o /tmp/temporal_statistics --cohort-ids ALL |
For user ease, openCGA provides a single command to perform full pipeline operation. The following command can be executed in place of above four sections (transform, load, annotate and statistics) to achieve same results. Note that we are not writing --transform and --load, since executing this two steps is the default behaviour, unless we specify one or the other.
| Code Block |
|---|
|
./bin/opencga.sh variant index --file ALL.chr22.phase3_shapeit2_mvncall_integrated_v5a.20130502.genotypes.vcf.gz --calculate-stats --annotate |
In order to see the status of the running jobs, you can use the folowing command:
| Code Block |
|---|
|
./bin/opencga.sh jobs search -s 1kG_phase3 |
At this point, data is fully loaded into openCGA storage along with annotations and calculated stats. User can perform different query to access/analyse this data.
| Code Block |
|---|
|
./bin/opencga-analysis.sh variant query --return-study 1kG_phase3 --region 22:16052853-16054112 |